MIRACL Trust is an OpenID Connect (OIDC) Identity Provider, so integrating with any system that supports OIDC is a matter of configuration. For more information about OIDC, see How OpenID Connect Works.
This integration is easy to use and almost zero-code (if there is a plugin). Its main advantage is that MIRACL Trust controls the whole authentication process and its security. Additionally, it can be integrated with a third-party system.
What makes the low-code integration fast and easy to implement is that you don’t need to develop your own authentication clients. You can use the ones provided by MIRACL Trust:
MIRACL Trust PIN Pad - the platform’s web client that provides a single-step, multi-factor authentication right within the browser. It gives end users access to several useful functionalities, such as email verification, device registration management (including PIN reset), device enrolment via QuickCode, and delegating authentication to the MIRACL Trust Authenticator application.
MIRACL Trust Authenticator - a mobile application for iOS and Android that mirrors the web client’s functionality, enabling authentication for desktop and mobile web sessions and other mobile applications.
The built-in user verification that comes with the low-code integration allows you to have a fully functional authentication system without writing a single line of code, with support for desktop, mobile and cross-device authentication. The end user’s email address serves as the User ID for this verification method and is verified through a verification code or verification link sent to the email address. End users need to enter the code or open the link to prove ownership of the email address. For more information, see Built-in User Verification.
Although seemingly simple, this integration serves as a foundation for any further system configuration. Whether you’re just starting out or need to create a more complex solution, you can use this integration as a starting point and add custom flows as needed.
If your web application supports OpenID Connect, you can easily integrate it with MIRACL Trust in just a few minutes. To get started, follow the step-by-step instructions in this guide.
Before you begin, you must register on MIRACL Trust.
# Create a Project
When you first register, you are taken to the Welcome page of the MIRACL Trust Portal where you are prompted to create a project.
Click Create Your First Project. The Create Project page appears.
Enter a name for your project and click Create. Your project’s dashboard is displayed.
If this is not the first time you log in the Portal and have already created a project, to create a new one, follow the steps in Create a Project.
# Generate Client Credentials
After creating a project, generate your Client Credentials. They consist of the Client ID and Client Secret, which are required to configure your OpenID Connect integration. You must also specify one or more valid Redirect URLs for authentication to work.
Select OpenID Connect on the sidebar.
In the Client Credentials section, click Generate New Credentials.
In the Redirect URL, enter the URL to which users will be redirected after authentication. This is where the OpenID Connect authentication response is sent.
For example, if your application runs locally on
http://127.0.0.1:5000, a typical redirect URL might behttp://127.0.0.1:5000/login, where theloginendpoint typically handles the OIDC code exchange for ID and access tokens.Make sure the URL matches exactly; otherwise, the redirection will fail with the following error:
{
  "error": "INVALID_REQUEST_PARAMETERS",
  "info": "Missing or invalid parameters from the request.",
  "context": {
    "params": "redirect_uri"
  }
}
(Optional) Use Add New Redirect URL to whitelist additional Redirect URLs.
Click Generate. Your Client ID and Client Secret are displayed.
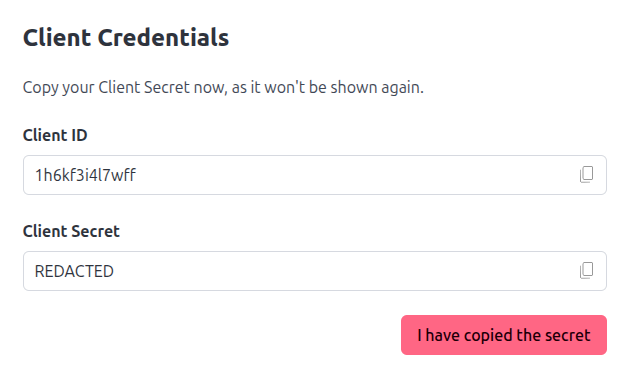
Copy the newly generated Client Secret.
The Client Secret is shown to you only once when you generate the credentials, so make sure you copy and save it when first displayed.
Click I have copied the secret to close the screen.
## Rotate Your Client Credentials
If you want to rotate your Client Credentials, follow the steps below:
Generate new Client Credentials (as described above).
Replace the old Client Credentials in your application with the new ones.
Revoke the old Client Credentials by clicking the Revoke button in the same row in the Client Credentials table as your Client ID. A dialog box is displayed informing you that if you confirm, all OpenID Connect integrations using these credentials will stop working and end users won’t be able to authenticate.
Click Confirm.
## Modify Redirect URLs
To update your Redirect URLs:
Click the edit button next to the list of Redirect URLs.
In the Modify Redirect URLs, add or remove URLs as needed.
Click Save.
# Integrate with Your Application
Now that you have a Client ID and Client Secret, you can start configuring your integration with the MIRACL Trust authentication through OIDC. For this purpose, you need to have an OIDC plugin or library installed.
For a list of certified OpenID Connect Libraries, see https://openid.net/developers/certified-openid-connect-implementations/.
Additionally, check out MIRACL Trust’s Samples, which showcase the integration between the platform and various OIDC libraries.
For more information about integrating with the OpenID Connect implementation provided by MIRACL Trust, see OpenID Connect.
## Configure Your Integration in the MIRACL Trust Portal
After you do the above, you can make some additional settings in the Configuration section of the MIRACL Trust Portal:
- General
On this page, you can set your application’s login methods and PIN length.
- Branding
Use the options on this page to configure what is displayed on your authentication page: logo, page title and theme, support email and phone number. You can also add a link to your help centre and select the default language.
- OpenID Connect
On this page, you can set some OIDC-specific options:
- Token Endpoint Authentication Methods
- PKCE Code Challenge Methods
- PKCE Only Token Exchange
Press the Save Changes button at the bottom of each page before proceeding to the next one; otherwise, you will lose your settings.
# Next Steps
You have now configured MIRACL Trust’s with built-in email verification. If you need a different verification flow, you can explore Custom User Verification.
If you want to use the authentication on a mobile device, you can either try the MIRACL Trust Authenticator that comes out of the box or integrate the mobile authentication in your application using the MIRACL Trust SDKs.